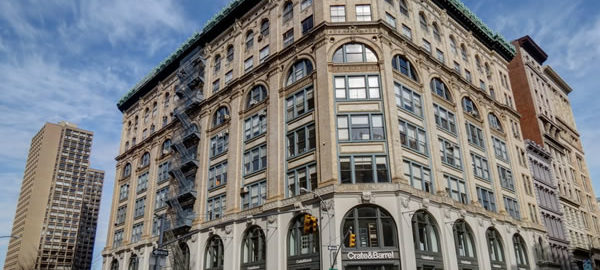
Digital photography is wonderfully fast and cheap compared to conventional film photography: There’s no film to buy (or run out of!) or process – a single memory chip can store more than a thousand images, and be reused indefinitely. But digital photo display can be challenging, because digital photos don’t capture and store all of the image the same way that the human eye sees it. Frequently, what we see on the screen lacks shadow details or highlight details or both. And cameras are easily tricked by unusual lighting conditions, such as scenes with strong backlighting.
Architectural photography typically includes strong backlighting – a building with sky as backdrop – and/or shooting in bright sun, where shadows are especially deep and dark compared to the rest of the photo. Consequently, a typical building photo will have some areas that are underexposed and/or some areas that are overexposed. You won’t be able to see (on the computer screen) the details in shadows or highlights that the eye would normally see in real life.
When I started taking photos for this website I had to discard many photos because the camera meter was tricked by the backlighting. Then I started bracketing photos – taking shots that were intentionally overexposed and underexposed. The best of the three exposures would make it to the website. This was better, but still lacking.
In January, 2013 I began using High Dynamic Range (HDR) photography for NewYorkitecture.com. I was still bracketing each shot. But instead of selecting one of three images I used software to combine all three images. The normal exposure provided the photo’s midtones; the underexposed image provided the highlight details; the overexposed shot contributed the shadow details.
This technique imposes its own set of challenges: To work, the three images have to be EXACTLY the same. If the camera shifts even a fraction of an inch the final result won’t be sharp. And anything that moves between images – like cars, pedestrians, birds or planes – will be blurred or “ghosted” in the final image. So every shot has to be taken on a heavy tripod, and usually multiple times to catch breaks in traffic. But the results were often worth the extra hassles.
The software that I use can also create special effects with those three images – I’ve included a couple in the gallery above – but I only use the default “natural” setting for the galleries in this site.
If you’re interested in using this technique yourself, you’ll need: A good tripod; a camera that lets you over/under expose (preferably with an automatic bracketing mode); software to combine the images. I’ve tried a few different software packages, I like Photomatix from hdrsoft.com. They have a $39 “Essentials” version (free trial), and a $100 “Pro” version that has added features – the most important being the ability to automatically batch process hundreds of images.
In late April, 2013 I started using Adobe Photoshop Lightroom 4 to make additional improvements – the most important being perspective correction. When you point a camera upwards to capture a whole building, vertical lines converge toward the top; the building seems to lean backwards. Occasionally, this makes a dramatic photo, but as a steady diet…. Lightroom (or Adobe Photoshop) can correct this, bringing all verticals back to vertical. The program also gives me greater exposure control than I have with HDR alone, so I can bring out even more detail. Many of Lightroom’s features are available in the free Gimp program, but Lightroom’s interface is so much easier to use.
I’ve stopped using HDR as a regular practice. I’m now using Lightroom and Photoshop to tweak exposures most of the time, saving HDR for only the most challenging lighting conditions.
GIMP – The GNU Image Manipulation Program is available at: www.gimp.org/. Adobe now “sells” Lightroom and Photoshop together as a Creative Cloud bundle for photographers, at $9.99 per month. This may seem odd, if you’re used to buying software, but in practice it’s far more economical than the old purchase-and-annual-upgrade cycle. As a bonus, you always have the most powerful, up-to-date software. You can get the details at Adobe.com.

![1_IMG_0121 [2/19/2012 11:43:09 AM] 1_IMG_0121 [2/19/2012 11:43:09 AM]](https://www.newyorkitecture.com/wp-content/gallery/newyorkitecture-photo-technique-hdr/1_img_0121.jpg)
![2_IMG_0122 [2/19/2012 11:43:10 AM] 2_IMG_0122 [2/19/2012 11:43:10 AM]](https://www.newyorkitecture.com/wp-content/gallery/newyorkitecture-photo-technique-hdr/2_img_0122.jpg)
![3_IMG_0123 [2/19/2012 11:43:11 AM] 3_IMG_0123 [2/19/2012 11:43:11 AM]](https://www.newyorkitecture.com/wp-content/gallery/newyorkitecture-photo-technique-hdr/3_img_0123.jpg)
![4_IMG_0121_2_3Adjust [2/19/2012 11:43:09 AM] 4_IMG_0121_2_3Adjust [2/19/2012 11:43:09 AM]](https://www.newyorkitecture.com/wp-content/gallery/newyorkitecture-photo-technique-hdr/4_img_0121_2_3adjust.jpg)
![5_IMG_0121_2_3_tonemapped [2/19/2012 11:43:09 AM] 5_IMG_0121_2_3_tonemapped [2/19/2012 11:43:09 AM]](https://www.newyorkitecture.com/wp-content/gallery/newyorkitecture-photo-technique-hdr/5_img_0121_2_3_tonemapped.jpg)
![6_IMG_0136 [2/19/2012 11:46:22 AM] 6_IMG_0136 [2/19/2012 11:46:22 AM]](https://www.newyorkitecture.com/wp-content/gallery/newyorkitecture-photo-technique-hdr/6_img_0136.jpg)
![7_IMG_0137 [2/19/2012 11:46:23 AM] 7_IMG_0137 [2/19/2012 11:46:23 AM]](https://www.newyorkitecture.com/wp-content/gallery/newyorkitecture-photo-technique-hdr/7_img_0137.jpg)
![8_IMG_0138 [2/19/2012 11:46:24 AM] 8_IMG_0138 [2/19/2012 11:46:24 AM]](https://www.newyorkitecture.com/wp-content/gallery/newyorkitecture-photo-technique-hdr/8_img_0138.jpg)
![9_IMG_0136_7_8Adjust [2/19/2012 11:46:22 AM] 9_IMG_0136_7_8Adjust [2/19/2012 11:46:22 AM]](https://www.newyorkitecture.com/wp-content/gallery/newyorkitecture-photo-technique-hdr/9_img_0136_7_8adjust.jpg)
![9a_IMG_0136_7_8_tonemapped [2/19/2012 11:46:22 AM] 9a_IMG_0136_7_8_tonemapped [2/19/2012 11:46:22 AM]](https://www.newyorkitecture.com/wp-content/gallery/newyorkitecture-photo-technique-hdr/9a_img_0136_7_8_tonemapped.jpg)